
Mon - Sat 9:00 - 17:30
In confined space entry, ventilation is your primary lifeline. But simply using a fan isn't enough—it's often dangerously misleading.
A blower's "Free Air" rating is not what you get in the field. Don't guess with your team's safety.
Follow these 4 steps to optimize your ventilation and engineer a truly safe atmosphere.
Optimizing the selection of ventilation equipment for confined space entry is a critical safety process that goes beyond just picking a fan. It involves a quantitative approach to ensure the equipment's effective airflow can control the specific hazards in the space.
Here is a step-by-step guide to optimizing your selection.
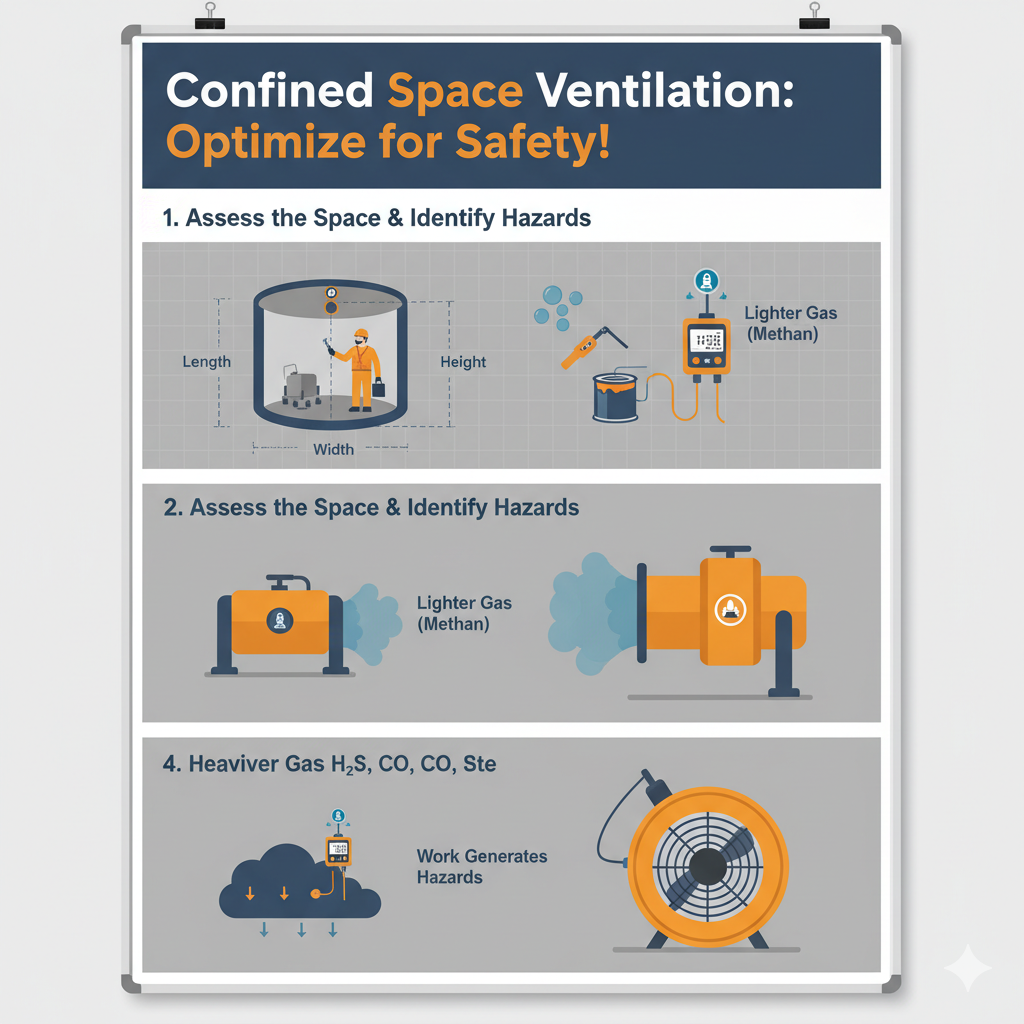
1. Assess the Space and Identify Hazards
First, you must understand the environment you need to ventilate.
Calculate Space Volume: Determine the volume in cubic feet.
Formula: $Volume = Length imes Width imes Height$
Example: A tank 10 ft long, 10 ft wide, and 15 ft high has a volume of $1,500 ext{ ft}^3$.
Identify Hazards: Use a calibrated gas meter to test the atmosphere at all levels (top, middle, bottom). Common hazards and their properties will dictate your strategy:
Lighter-than-air gases (e.g., methane): Will collect at the top.
Heavier-than-air gases (e.g., hydrogen sulfide, carbon monoxide): Will sink to the bottom.
Source of Hazard: Is the hazard already present (e.g., off-gassing sludge) or will it be generated by the work (e.g., welding fumes, solvents)?
2. Choose the Right Ventilation Strategy
Based on your hazard assessment, select the optimal ventilation method. Positive pressure is the most common and often preferred method for general-purpose entry.
Ventilation Strategy How It Works When to Use It (Optimization) Positive Pressure (Supply) A blower forces fresh air into the space, pushing contaminated air out through an opening. This is the preferred default.
* Best For: Purging a space with a known, clean air source. It's the only method that can direct fresh air to a worker's location.
* Contaminant Strategy:
* Heavier Gas (H₂S, CO): Position the duct to blow fresh air from the top to push bad air out the bottom opening.
* Lighter Gas (Methane): Position the duct to blow fresh air from the bottom to push bad air out the top opening.
Negative Pressure (Exhaust) A fan pulls contaminated air out of the space, drawing fresh air in through an opening. This is for "source capture."
* Best For: When work inside the space (like welding, painting, or using solvents) generates a new contaminant.
* How: Place the exhaust duct directly at the source of the fume/vapor to capture it before it contaminates the entire space.
* Risk: Never use this for general entry if the replacement air source is unknown (e.g., it could pull in sewer gas from another manhole).
Push-Pull (Combination) Uses two blowers—one in supply (push) and one in exhaust (pull). For complex or large spaces.
* Best For: Long tunnels or large tanks with limited openings, where a single blower can't create effective airflow.
* How: One fan pushes fresh air in one side, and another fan (often paired with source-capture ducting) pulls contaminated air out the other.
3. Calculate Your Required Airflow (Target CFM)
You must determine the "target" airflow, measured in Cubic Feet per Minute (CFM), needed to keep the space safe.
Target 1: Continuous Ventilation
This is the airflow needed while workers are in the space. A common industry best practice is 20 air changes per hour (ACH).
Formula: $Target ext{ CFM} = frac{ ext{Volume (ft}^3 ext{)} imes ext{ACH}}{60 ext{ min}}$
Example: For the $1,500 ext{ ft}^3$ tank:
$Target ext{ CFM} = frac{1,500 ext{ ft}^3 imes 20 ext{ ACH}}{60} = 500 ext{ CFM}$
Note: As a cross-check, some regulations (like for underground construction) require a minimum of 200 CFM per worker inside the space. Your Target CFM should meet or exceed this.
Target 2: Initial Purge Time
This is the time needed to ventilate the space before anyone enters. The goal is to get hazard levels below safe limits (e.g., <10% LEL, <10 ppm H₂S, <35 ppm CO).
Simple Method (Rule of Thumb): Use 7 air exchanges for a standard purge (or 10-11 if toxic gases are present).
Formula: $Purge ext{ Time (min)} = frac{ ext{Volume (ft}^3 ext{)} imes 7 ext{ Exchanges}}{ ext{Effective CFM of Blower}}$
Advanced Method (for specific toxics): If you have a high reading of a specific toxic gas, you can calculate the exact time needed to reduce it to a safe level.
Formula: $Purge ext{ Time (min)} = frac{ ext{Volume}}{ ext{Effective CFM}} imes lnleft(frac{ ext{Initial Concentration}}{ ext{Final Concentration}} ight)$
ln = natural logarithm
4. Select the Blower (Optimizing for Effective CFM)
This is the most critical and most overlooked step. A blower's "Free Air" rating (e.g., 2000 CFM) is not what you will get. Ducts and bends create resistance (static pressure) that dramatically reduces airflow.
Your goal is to select a blower whose Effective CFM is greater than your Target CFM.
Step 1: Get the Blower's "Fan Curve"
Ask the manufacturer for the "Fan Performance Curve." This chart is not a sales gimmick; it's the most important piece of data you have. It plots CFM (horizontal axis) against Static Pressure (vertical axis).
Step 2: Calculate the "Total Effective Length" (TEL) of Your Duct
Resistance is calculated by adding the straight length of your duct to the "equivalent length" of all bends and fittings.
Formula: $ ext{TEL} = ( ext{Straight Duct Length}) + ( ext{Equivalent Length of all bends})$
Common Equivalent Lengths (Rules of Thumb):
One 90° bend = 30 ft of straight duct
One 45° bend = 15 ft of straight duct
Not pulling a flexible duct taut can double or triple its effective length.
Step 3: Find Your Effective CFM
Calculate TEL:
Example: You plan to use 50 ft of straight duct with two 90° bends.
$ ext{TEL} = 50 ext{ ft} + (30 ext{ ft}) + (30 ext{ ft}) = 110 ext{ ft}$
Find Static Pressure: Use a manufacturer's chart or "ductulator" to find the static pressure for your TEL. (This is complex, but the concept is key: more TEL = more static pressure).
Read the Fan Curve: Look at the fan curve. Find the static pressure from your duct run on the vertical axis. Follow that line over to the curve and then down to the horizontal axis. The number it lands on is your Effective CFM.
The "Optimization" Moment:
Your calculation required 500 Target CFM.
The blower you're looking at is rated for "1500 CFM Free Air."
But after calculating your 110 ft of TEL, you check the fan curve and see it only provides 400 Effective CFM at that resistance.
Conclusion: This blower is not optimized and is unsafe for the job. You must select a more powerful blower that can provide at least 500 Effective CFM with your specific duct setup.
We offer a full suite of HSEFS services designed to address your specific challenges and goals :
HSE Consulting & Advisory,
HSE Auditing & Assurance,
HSE Training & Development,
Implementation & Support,
Environmental Services
GST: 24ABDCA0826H1Z3
CIN: U71100GJ2025PTC163795
Copyright 2025. Agni Raksha Niti Engineering Consultancy Services Pvt. Ltd. All Rights Reserved.